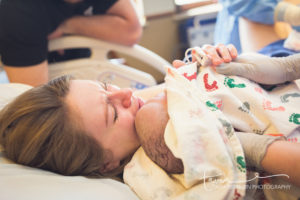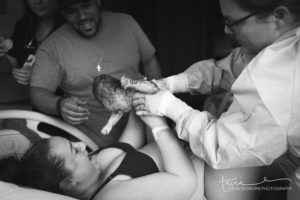

This is everything.
This is what your clients think of when they think “birth photography.”
I love to call this moment, the “I did it” moment.
It’s the split second when mom is like “holy crap I just did that!” Sometimes moms are elated, sometimes they cry hysterically and sometimes they just lay back and let out a huge sigh of relief.
No matter what their reaction, this is the moment that’s going to bring them right back to their powerful birth experience.
Now, how do you make sure you capture the “I did it” moment as a birth photographer?
Here are 3 steps to make sure you can get this moment for your clients: (the following steps are assuming you know your camera inside & out, and you also have a solid understanding of the unpredictability of birth).
1) To capture the “I did it” moment, have all backups ready to go, transportable & camera empty.
I keep my backup camera with me at all times during pushing, as well as my spare batteries and spare equipment.
The “I did it” moment is SO FAST. If the camera you’re holding stops firing for one reason or another, you do not have time to go into the other room or change memory cards or change out your battery. You need to set up your space so that you can grab your second camera and start firing. That second camera should have batteries charged, memory card empty and inside the camera.

2) To capture the “I did it” moment, understand that sometimes that moment doesn’t happen when you think it will (and there might be more than one moment)
Be prepared for more than one “I did it moment!” I have my camera ready to fire for a solid 10 minutes after birth.
Of course there is the moment immediately following delivery where she sees her baby.
Also, a couple of minutes later when it really sinks in she might just have another “holy crap I did it” moment, so be ready for that!
I’ve also had moms get emotional when the lock eyes with a certain person in the room. Their child, their mom, their doctor or midwife… so that I did it moment can come well after initially seeing their baby.
Basically, just always be ready 😉
Also, sometimes you can say “You just did it mama!” or “Way to go girl, you’re amazing!” (from behind your camera, ready to snap a photo) and she will outwardly express how she’s feeling.
3) To capture the “I did it” moment, take note of all the variables.
Which variables should you pay attention to?
- Mom’s position while pushing. Think ahead about where she’s going to be once she’s holding the baby and when she sees baby. Hands and knees can be tricky because they usually pass baby underneath mom to her face.
- Is the doctor going to come in and raise the bed so high you can’t see much (shoutout to my fellow short birth photographers!) Maybe you should bring a small stool.
- Is a nurse going to step in front of you to wipe off baby? Where will you stand if she does?
(another tip about hospital births: I like to establish “my spot” during pushing and ask the nurse, “Is it ok if I stand here and don’t move during delivery? I want to make sure and get great photos for mom AND stay out of your way!”)
- Is someone going to turn on/off a light at the last minute? There is nothing wrong with shooting in Aperture or Shutter priority during pushing when lighting conditions can quickly change (and of course, please shoot in RAW!)
Those are just a few situations that are common to be aware of when trying to capture mom’s first reaction!
Sometimes, it’s really hard to capture this for each and every birth. There are certainly situations where there is a misstep or extenuating circumstance.
But, it’s your job as the professional to be as prepared as possible for all the “what-ifs!” I always discuss the “what-ifs” with my clients, and remind them that I can’t guarantee any specific image but I will do my very best!
What if mom doesn’t have any kind of reaction at all? That is beautiful, wonderful and part of her story too! I never want to make a mom feel badly for her “lack of a reaction” so I try to showcase all types of reactions and “I did it” moments on my social media and blog.
Did you find this information helpful? Any other tips you’d like to add? I’d love to hear from you in the comments!
Reading content does you no good if you don’t find ways to apply it to your business!
3 action steps from this blog post:
- At your next birth, make sure your extra camera and extra equipment are loaded up and within arms reach during pushing.
- Download the birth bag checklist & “uncontrollable variables you can control while photographing a birth” to make sure you’re prepared for all the “what-ifs”
- Look back at your last 3 births and ask yourself if there is anything you could have improved, knowing what you know now.
My 2nd birth was on hands & knees. She ended up delivering in the toilet/shower cubicle on the floor. There were 2 midwives, her mum, myself & my client all crammed into this small space. I was fortunate to get photos of mum feeling bubs crowning, the most amazing photo of bubs coming out facing me & the midwives handing the baby through her legs to the mum, with chord still attached, these were shots I never thought I’d get for quite a few years. It was a shot I have seen other photographers get & hoped it would be me too that got this shot, I also privileged to cutting the chord after her mum had cut it. It is truly an honour & privilege to be able to capture the moments for them.
My tip is to stay positive & do all the affirmations in this course as so many things really start to happen when you start believing. So much has started to happen for me in the last 8mths
Thank you Tavia for sharing this wonderful course with us.